recipe

Easy Hawaiian Upside-Down Deep Dish Pizza Recipe ~ Ragu #NewTraDish

What are your favorite meals to cook? I love experimenting with new recipes, and this Ragu Hawaiian Upside Down Deep Dish Pizza Recipe is perfect for a quick, satisfying for the entire family.  It was easy to prepare, tasted great and everyone loved it!

My friends at Ragú asked me to put a unique twist on a recipe from Ragu.com. There were so many amazing recipes to choose from, but I was drawn to the recipe for the Upside Down Deep Dish Pizza.  When I think of pizza, "Hawaiian" is one of our family favorites. So, I decided to add diced ham and pineapple to this recipe and it was even better than I imagined it to be.

As a mom who is always trying to get my family to eat more veggies, it's great to know that each jar of Ragú Old World Style Traditional Sauce is made with 11 juicy tomatoes making it Ragú's thickest, richest sauce. 

Here are the ingredients for my Hawaiian Upside Down Deep Dish Pizza

  • 1 lb. very lean Ground Beef (I used the kind that was 96% fat free) You could substitute Ground Turkey too.
  • 1 jar (1 lb. 8 oz.) Ragú® Old World Style® Traditional Pasta Sauce
  • 10 ounces of Pineapple Tidbits (very well drained)
  • 4 ounces of cooked diced Ham 
  • 2 cups shredded part-skim mozzarella cheese
  • 1 can (13.8 oz.) refrigerated pizza dough

Here's how to make it: 

  1. Preheat oven to 375°. Brown ground beef in large nonstick skillet and drain any excess fat.
  2. Stir in Pasta Sauce and bring to a boil; turn into 2-quart deep dish pie plate or baking dish.
  3. Top with pineapple tidbots and diced ham, then cheese. Place pizza dough over dish, sealing edges tightly.
  4. Bake 20 minutes or until crust is golden. Let stand 10 minutes.

It's that easy!

To make it even simpler, the ground beef mixture can be even be cooked ahead of time and refrigerated in the baking dish until assembly time. Just heat it in the microwave until hot before topping and baking.  Perfect for those busy nights when we're coming home from a sports practice around dinner time!

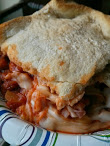
If you're family likes ham and pineapple pizza, I think they'll really like this recipe. It was hot, rich and very satisfying! Plus, it was so easy to make, that it didn't leave me with a mess in the kitchen - which I love too!

Visit Facebook.com/RaguSauce for more quick, easy and delicious recipe ideas.

Check out the Ragú Better and Better Sweepstakes for a chance to win Italian themed prizes and a trip to Venice, Italy, for a family of four! www.RaguSweeps.com

Easy Recipe for White Pine Tea

 I was checking out the Hilltown Families blog and I came across something I never expected to see.  It was a recipe for White Pine Tea from Leslie Lynn Lucio.  I have never heard of "pine tea," but after reading her blog post, now, I'm curious.

You have to be really careful to make sure you find the right type of pine tree, which Leslie talks about in her post.  But, once you find a White Pine tree, you just add some honey and lemon and you're ready to make your tea.

It definitely sounds like something that would warm your body and soul on a cold winter day. Plus, it's a fun way to get your kids involved in the kitchen.

Continue here to read her full post:  Oak & Acorn: White Pine Tea for Winter Days

Easy Raspberry OREO Cookie Ball Recipe #OreoCookieBalls


When the holidays come around, I always like to have some basic ingredients in the kitchen. That way, if I need to whip up a quick dessert for company, I'm ready. Oreo Cookie Balls are PERFECT for those days when you want to make a homemade dessert, but you don't feel like battling the crowds at the supermarket. The best part is, everyone I know LOVES these little dessert delights!  

The original Oreo Cookie ball recipe is fantastic, but, for this post, I decided to make Oreo Cookie Balls with a berry twist. My son is a huge fan of the Berry Burst Ice Cream Oreos. By using this variety of Oreos and adding a little Raspberry Extract to the recipe, I made Raspberry Oreo Cookie Balls, and they were phenomenal!

How do you make Raspberry OREO Cookie Balls?

Here are the Ingredients:
  • 1 pkg. (8 oz.) brick cream cheese, softened
  • 36 Berry Burst Ice Cream OREO Cookies, finely crushed (about 3 cups)
  • 1 tsp of Raspberry Extract
  • 4 pkg. (4 oz. each) semi-sweet baking chocolate, melted
  • Make it!

Directions to Make Oreo Cookie Balls:

  1. First, take your OREO Cookies and chop them in a food processor until they are very finely crushed.
  2. Then, MIX the cream cheese, raspberry extract and cookie crumbs until blended. 
  3. SHAPE into 48 (1-inch) balls. 
  4. Freeze 10 min. 
  5. Dip balls in melted chocolate; place in single layer in shallow waxed paper-lined pan. 
  6. Decorate!
  7. REFRIGERATE 1 hour or until firm.
  8. Share and enjoy!

Cookie balls are easy to make and a great way to spread a bit of festive cheer to friends and family!

My family were all impressed with this easy dessert. They loved the hard shell of chocolate on the outside, and the rich raspberry OREO center. Next time you're at the store, don't forget to grab these ingredients to keep on hand for a holiday dessert emergency!  

What's your favorite way to eat OREO cookies?


Easy Sensory Play Ideas From Babble

Summer is around the corner and there will be many moments where moms everywhere, including myself, need quick boredom busters for their kids. I'm not talking about complicated crafts that you have to plan ahead or buy lots of supplies.  I'm talking about EASY boredom busters where you can mostly use things you already have around the house.

Babble recently published a post called 25 Sensory Recipes Play Recipes for Kids.  I was so excited to see my Sand and Sea Keepsake highlighted in this post!  There are so many other cool sensory play ideas in this post, I have to share it with you.


Easy Recipe: How to Make Scotch Eggs

A little over 10 years ago, I was introduced to Scotch Eggs for the first time while I was in England. It was not love at first sight, but the idea of a hard boiled egg, wrapped in sausage, coated in breadcrumbs and deep fried grew on me.  When I first heard about these, I natually assumed they were from Scotland, but that's not the case.

Supposedly, the London department store Fortnum & Mason invented Scotch eggs way back in 1738.  According to Wikipedia, they're also a traditional snack food served on a stick at the Minnesota State Fair in the U.S. If you look hard enough, you will find Scotch eggs in the Philadelphia area, but they are not common at all.

So, this past week, I decided to make Scotch Eggs at home, and it was actually a lot easier than I expected. Everyone love it and I'm looking forward to making them again for Easter!

Here's how to make scotch eggs.  You will need:

  • 1 dozen hard boiled medium size eggs
  • 2 pounds of Jimmie Dean Raw Pork Sausage
  • About 2 cups of Panko Breadcrumbs
  • 2 raw eggs
  • 1 bottle of Canola Oil

First, I preheated my oven to 350 degrees F.  Then, I poured the bottle of Canola Oil into a deep pot and turned it on high. 

Under running water, I peeled the shells off all of the hard boiled eggs. Then, I wrapped each egg in  a layer of raw pork sausage, dipped it in raw egg and then, rolled the sausage covered egg in panko bread crumbs.

Once the oil was really hot, I gently placed one egg into the oil.  I've seen recipes that say to fry the Scotch egg for 10 minutes, but my oil was so hot, I flashed fried the egg for about 5-10 seconds which was perfect.

Then, once all my eggs were ready and fried, I placed them on a baking sheet and baked them for about 25 minutes.

If you love breakfast and brunch, you have to try this recipe. Technically, they are good for any time of day. My kids love eggs & sausage, so no matter when they're eating them, it's a fun, family-friendly treat.

Have you ever had Scotch Eggs?  What do you think?

Recipe adapted from AllRecipes.com

Chewy Chocolate Marshmallow Cookie Recipe


Milk and Cookies.

Yum!

I think I gained a pound just typing out the word "cookies," but, no one can deny the fact that milk and cookies definitely take center stage this time of year.  Not only is it tradition to leave Santa milk and cookies on Christmas Eve, but it seems like cookies are everywhere!  Luckily, Lehigh Valley Dairy Farms is making sure we have cold, fresh milk to pair with our favorite cookies. 

 Did you know, according to a study done at Cornell University, milk begins to lose essential nutrients, such as Vitamin A, in as little as 2 hours after being exposed to light. It also begins to have a noticeable difference in flavor.  But, Lehigh Valley’s new Pure Protect bottle protects your milk and carefully preserves both flavor and nutrients so every serving of Lehigh Valley milk is as good as the first sip. My family really enjoyed this milk.

So, I've been testing out different recipes, trying to come up with the perfect cookie to pair with Lehigh Valley Milk, and I think I've got it.  These Chocolate Marshmallow Cookies are the perfect combination of  chewy, flaky, chunky, delicate and delicious. They are an ideal match for a nice, cold glass of milk.

Here's the Recipe for these Chewy Chocolate Marshmallow Cookies:

* 2 cups semisweet chocolate chips
* 4 tablespoons butter
* 1 cup micro-mini marshmallows
* 2/3 cup white flour
* 1/2 teaspoon baking powder
* 1/2 teaspoon salt
* 2 large eggs
* 3/4 cup light-brown sugar
* 1 teaspoon vanilla extract
1. Preheat the oven to 350°. Put 1 cup of chocolate and 4 tbs of butter in a microwave safe bowl. Heat them on high for 20 seconds, and gently mix it up. Then, heat for another 20-seconds and give it a stir.  Keep heating in 20-second increments until it's melted. I think mine took about 60 seconds in total. Don't over-heat it because it will burn your chocolate. 
2.  Sift your flour into a separate bowl.  Then, add the baking powder and salt.
3. In a large mixing bowl, beat your eggs, vanilla and brown sugar on high speed. Once they're light and fluffy, gently fold in the melted chocolate and mix in the flour mixture until it's all combined. Finally, take the remaining cup of chocolate chips and 1 cup of micro-mini marshmallows and mix those in.
4. Put about 1-2 tablespoons of cookie batter onto your baking stone/cookie sheet. About 12 cookies per batch. Bake for about 13-14 minutes. The mixture may seem very thin at first, but it will fluff when it bakes. The cookies are done when they have a cracked look and are beginning to firm up. Note: before you move them to a cooling rack, you will need them to cool on the baking stone/cookie sheet for about 10 minutes.

If you've been wanting to make chocolate cookies this season, give this recipe a try.  I don't think you'll be disappointed. Then, come back here & tell me what you think!

Also, three of my lucky readers will win a set of Fall Cookie Cutters from King Arthur’s Flour.  Just leave a comment below and tell me your favorite type of cookie to be eligible to win. Winners will be selected 12/16.


“All you need is love. But a little chocolate now and then doesn't hurt.”
― Charles M. Schulz


*Please see my full disclosure here. Thanks to Lehigh Valley Milk for sponsoring this post.


Chocolate Milk Bath Recipe

Do you have a growing bucket list of fun things you want to do when you finally have the time & money?  If you live anywhere near the The Hotel Hershey, in Hershey PA, I highly recommend going to their Chocolate Spa.  Even if you only get there once in your lifetime, you have to do it!  It is the BEST spa I have ever been too.  You can get rubbed in chocolate, wrapped in chocolate, drink & eat chocolate, inhale the scent of chocolate and even bath in chocolate. And, it's not just for women - men can go too. I've been there two times and it is the perfect escape.  The hotel architecture is beautiful, their grounds are filled with exquisite flowers, and sneaking to the bar for a Death by Chocolate Martini is a must! 

Going to the spa is not in my budget at the moment, so I wanted to make a Chocolate Milk bath at home.  It's an easy way to do something different, treat yourself (especially if your Valentine let you down), and get a bit of much needed relaxation.

Here are the ingredients:

  • 1 Cup of dried Nonfat Powdered Milk
  • 2/3 Cup of Unsweetened Hershey Cocoa Powder
  • 2 tablespoons of Corn Starch
  • A couple cap-fulls of unscented Bubble Bath.
  • Ideally, you should also have a Chocolate scented candle, or some type of candle that smells like dessert.

Directions:

1) Make sure you're in a kid-free zone so you can really relax.

2) Clean out all of the kids' boats, duckys and other toys out of the bath tub.

3) Light your scented candle.  Even though the bath is VERY chocolatey,  it's nice to have the extra aroma in the air from a 'desserty' candle.

4) Start running your bath water, and pour all of your ingredients into the tub.  You should pour the bubble bath under the running water.  But, all of the other ingredients can just be sprinkled on top of the water, since they will naturally mix in.

5) Relax in the bath as long a possible. Enjoy!

Does bathing in chocolate seem over-the-top OR Do you love this idea?